It is quick and easy to setup Signature 365 integration with your Microsoft 365 tenant.
Create your account
If you have not already created a Signature 365 account, follow these simple steps:
Go to https://app.signature365.com and click Start my free trial in the upper right corner.

If you would like to use your Microsoft 365 account to sign in with SSO, click the Register with Microsoft 365 button. Otherwise, enter your details and click the Register button

You have now created your Signature 365 account and the Signature 365 dashboard will show in your browser.

What is required to configure integration with Microsoft 365?
To configure integration with your Microsoft 365 tenant you will need:
- Global administrator credentials for your Microsoft 365 tenant
- A mail-enabled security group in Exchange online if you want to limit Signature 365 to specific users. We suggest using this option to trial the software.
- Access to your domain provider to update the SPF record for your domain if you are using Server-side injection
Please note that it is also possible to update the configuration settings after the initial configuration is complete.
You are now ready to setup the integration with your email platform.
Configure integration with Microsoft 365
Open the setup wizard by clicking Setup under Finish setting up your account in the dashboard or select Integrations > Microsoft 365 > Enable.


The next screen details the steps you will complete as part of the setup process. Click Next to proceed.

You will now select the method you will use to insert signatures into your emails.
Client-side will insert signatures as the email is composed, and does not route any email through the Signature 365 service. This requires the Signature 365 add-in for Outlook or the classic Signature 365 Agent to be installed for the user.
Server-side will route all email for included users through the Signature 365 service, and insert signatures into all sent email from any device. Signatures are inserted after the email is sent and sent items are updated accordingly.
Both is the recommended configuration and will insert signatures as the email is composed when using Outlook. Only emails sent from other email clients will be processed server-side to have a signature inserted.
Select the method you wish to use and click Next to proceed.

The next screen details the permissions that are required by Signature 365 to access Azure Active Directory in order to import your users. Click the Authorise button to start this process and sign in using a Global Administrator account.

Review the requested permissions and click Accept to continue.

You will now be able to select the users and attributes you want to import into Signature 365. You can choose to import all users from Azure Active Directory, or specific groups of users via mail-enabled security groups. We suggest importing specific groups to manage users that have access to Signature 365.
Click the Add Group button to select the groups you want to import, and click Next to continue.

The following screen will check the SPF record for your domain - if you are using server-side signatures, you must configure your SPF records to prevent emails routed through Signature 365 being potentially marked as spam. You can read more about this by clicking Read more about adding SPF records.
Either update your SPF records and click Check again once the SPF record is updated, or click Continue if you wish to add this to your SPF record at a later time. This will prompt you with an alert if this is not completed.

If you are using Server-side injection, the next screen will configure the mail flow rule used to route emails to the Signature 365 servers.
If you specified a mail-enabled security group when importing users, you will need to set Handle emails from users in a specific group to ensure that only mail from users with access to Signature 365 is sent to our servers.
Information
If you add addtional groups to import at a later date, you will need to update the mail flow rule in Exchange online to take account for this. Please see the "Modify the transport rule" section of the following article for details on how to do this:
Restrict access to Signature 365 using an Office 365 Security group

The setup wizard is now ready to setup the integration with Microsoft 365. To do this Signature 365 will create a Send Connector, Receive Connector and Transport Rule in your Microsoft 365 tenant. Signature 365 can do this for you automatically, or you can perform a manual setup using a PowerShell script.
We recommend you click Automated setup to complete integration.

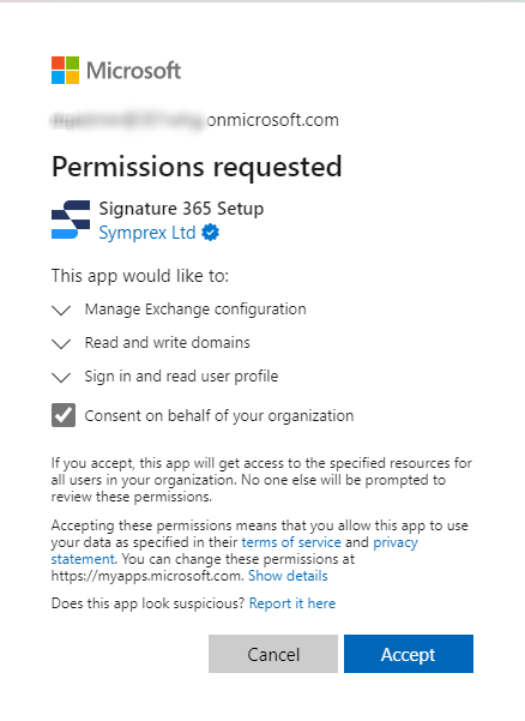
The following screen details the permissions that are being requested on your Microsoft 365 tenant. Review these and click Accept. We recommend selecting Consent on behalf of your organization.
Following authorization, Signature 365 will complete the steps required to integrate with your tenant. When the process has completed you will be able to click Next to proceed.
Information
This process can occasionally fail to authorise with Microsoft. If this occurs, select the retry button and re-authorise. If this does not resolve the issue, please contact support@symprex.com so we can investigate your problem.

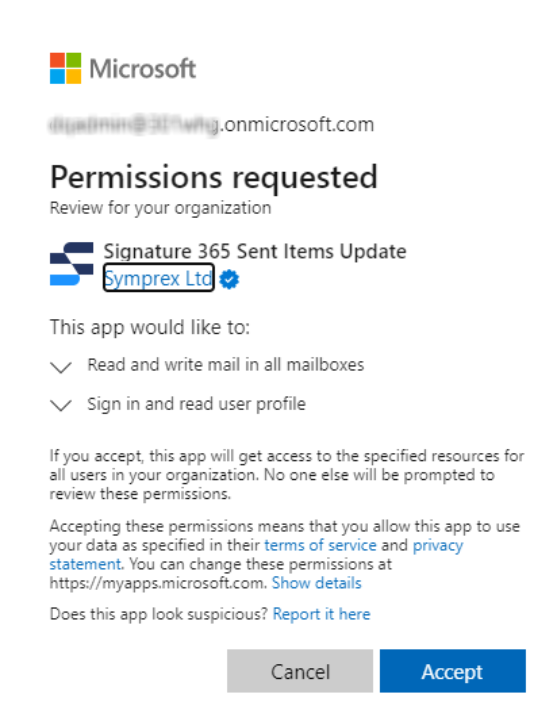
Signature 365 has the ability to update sent items for emails that are sent using server-side signatures. This requires permission to read and write to all mailboxes on your domain.
You can choose to Skip or Authorise this function. Selecting Authorise will require your Global administrator account to configure this.

The following screen details the permissons that are being requested. Click Accept to grant these and proceed.
Once this is complete, a page will be displayed detailing how to install Signature 365 add-in for Outlook. Once you have reviewed the page, click Complete setup to proceed, and Go to dashboard to return to the dashboard


You Microsoft 365 tenant is now configured to integrate with Signature 365. Users and groups will be imported every hour. If you selected the option to apply signatures to email from all devices including mobiles, email will be routed via Signature 365 for signature injection and then back to your Microsoft 365 tenant for delivery.
You can now proceed to upload images for your signatures, create signatures, and create rules to assign your signatures to users and groups.
You may also want to enable signature preview in email clients and to enable updating of sent items if you did not complete this as part of the setup process. See below for more information.
Install the Signature 365 add-in for Outlook
The Signature 365 Outlook add-in allows you to preview the signatures that will be added to emails by the Signature 365 service. The add-in is very easy to deploy via the Microsoft 365 Admin center and works in Outlook 365 on Windows, Outlook on Mac, and Outlook on the web.
How to install the Outlook add-in
Install the Outlook Classic Agent for Outlook 2016/2019/2021
Due to limitations imposed by Microsoft, the Outlook add-in is not compatible with perpetually licenced versions of the Outlook desktop client.
The Outlook Classic Agent is available for these versions, please see below for more information.
How to install the Outlook (Classic) agent
Enable update of sent items
If you are using server-side injection, Signature 365 is able to update sent items and by default, does so by updating the actual sent item. The updated email contains the injected signature and shows the exact email received by the recipients.
Enabling this option requires full read / write access to all mailboxes on your Exchange Online tenant.
Please note that this is only required if you are using Server-side injection